Spring boot tutorial is intended for beginners who are having hard time understanding what is spring boot! This tutorial on Spring Boot is made in beginner friendly way that even a caveman (or women!) should not have any problem understanding.
What’s more? After you go through this tutorial, you can add this new skill in your resume and somehow make it look appealing 🤩
Note : In order to keep this tutorial ‘short’ and ‘to the point’. I prefer not to show full examples initially, but only some key aspects to explain you the concept. However, in the end we will go step by step on how everything is done along with source code. Just sit back and enjoy for now. Sounds good?
Goal(s) of this tutorial..
- Familiarize you with ‘Spring Boot’ and it’s core features
- Make you comfortable creating ‘Spring Boot’ projects
- Help you add this new skill in your resume
Why learn spring boot?
- It’s a must learn technology especially for building Microservices
- Spring boot makes your life easy by eliminating the need to write boilerplate code (You will know how, in this tutorial)
Before you proceed, make sure you have..
- Some knowledge on Java Programming
- Willingness to go though this tutorial completely without distractions
- Good to have : Some understanding on Spring Framework & Spring MVC
Recommended course(s) : Java Programming , Spring Core Framework , Spring MVC with Spring Boot
[the_ad id=”2285″]
Topics that you will understand finally..
This spring boot tutorial will briefly cover the following concepts,
- What is spring boot?
- What does spring boot do?
- Spring boot starter dependencies
- Auto-configuration
- Spring boot initializer
- Using Spring tool suite
- spring boot in eclipse
- Spring boot example
- Embedded servers
- Fat Jar, Self contained jar, Runnable jar
- Understanding Maven Dependencies
Note: Each of the above topic, deserve an article of their own. Hence, I will only brief about them and give you a sense of understanding on why they exist. I mean, you don’t want to read a 100000 line article right?
With that in mind, let’s begin our journey to the center of the spring boot..
Video version : If you are a fan of video tutorials like me, then you can watch the video version of this tutorial which is more elaborated. Or better yet, read the article and then watch this video!
Setup requirements
You need JDK and Maven installed. If you’ve reached to a point, where you want to learn Spring Boot, then the least I’d expect is that you know how to run Java programs. Which also mean, i’d expect you to know how to install JDK.
‘Maven’ however, could be new to you. For now, you don’t have to know what it is, as we will discuss a bit about it in next section. You can install Maven just as you would install JDK by setting the environment variables (Demonstrated in spring boot video tutorial)
You’d also need an IDE. I am using the latest version of ‘Eclipse’ for the same..
A little bit about maven
Although this is a spring boot tutorial, you need to have some knowledge on Maven. Don’t worry, this section is dedicated to familiarize you with couple of features that maven has to offer.
JDK doesn’t come with all the libraries that you’d ever need right? Chances are that, your project depends on another project or external libraries. If you are talking about large scale enterprise applications, we are talking about some big numbers.
It’s hard and unreliable to manually search the dependencies over the internet, download them, store them in local machine and then import them in to your project.
Wouldn’t it be nice if you had a tool, where all you have to do is to add an XML tag in one special file (pom.xml) , and that tool will do all the heavy lifting? I mean, the tool will download and store the libraries in the classpath on your behalf. That is exactly what is Maven.
The xml tag that you add in pom.xml may look something like this
<dependency>
     <groupId>org.apache.poi</groupId>
      <artifactId>poi</artifactId>
     <version>4.1.0</version>
</dependency>
By specifying the above tag, we are asking maven to download Apache-POI library of version ‘4.1.0’ in to our class path. Maven will not only download the dependent library, but also the libraries that the dependent library depends on! (Sounds like a tongue twist, but it’s true!)
I found that tag with a quick google search (Surely better than me manually downloading bunch of .jar file and storing them in the classpath!)
Well actually, maven is much more than that. But, this is the feature of it, which is very relevant for this tutorial.
Forget about what is ‘groupid’,’version’ etc. That will take us to maven world. Just remember, that if we need to use another library, we’d add an xml tag in pom.xml.
If you are still disparate to learn Maven, I recommend this Maven course.
What is spring boot? The first obvious question..
“Spring Boot makes it easy to create production-grade stand-alone Spring based Applications that you can ‘just run'”.
But wait!! What does that even mean?
I don’t want to explain what it means now. You will understand that definition by yourself, once you finish reading this article. But, lets us talk about some of the problems you may have to face if you are not using spring boot.
Let’s assume you are about to create a brand new application. Here are the typical steps you need to take as a developer,
- Create a Maven/Gradle Project in eclipse
- Find the required dependencies and add those tags in POM.xml
- Download the Tomcat Server, install it and configure in IDE (To run/test the application)
- Download and install Database Software and run it (If your application is Database driven)
- Code your application
- Create a config file(s). In case of spring, you’d need to define all the beans (Dispatcher servlet, View Resolver, etc)
- If there is a DB, you need to configure database parameters, Datasource, Entity Manager (Or for any other service)
- Build the project, Deploy the artifact on to the server and run it
Can you guess what is the problem with the above procedure? It’s okay, take your time and think about it.. (I’ve already given clue!)
Well the problem here is, as a developer, you must be focused on writing your application (Step no ‘5’). But you are also forced to pay attention to the infrastructure that will help you write/run your application (The other steps).
If it’s a “Hello World!” application, we don’t have to worry much. But, imagine the time/effort/money it takes to create/manage large scale enterprise applications with millions of lines of code!
Wouldn’t it be cool if there is some tool, that will take care of all the steps mentioned above and let the developer focus on writing the application (Step no ‘5’). That is the very purpose of ‘Spring Boot’. It may sound like ‘2050’ feature, but spring boot is already doing it!
‘Spring Boot’ will allow rapid development and organizations can promise their clients faster deliveries and reach their expectations. Now you know why employers are willing to shell out some extra money to hire individuals with Spring Boot expertise.
Creating Spring Boot Project
There are basically 3 ways you can create a spring boot project
- Using Spring Tool Suite Eclipse plugin (Recommended!)
- Using Spring Initializr
- Through command processor
Whichever way you follow, ultimately it would end up in your IDE. We will talk about all of them in this section.
Creating Spring boot project using spring tool suite Eclipse plugin
Open Eclipse and then go to Help > Eclipse Marketplace, search for ‘Spring Tool Suite’ plugin. Install the one from ‘pivotal’
Once installed, go to File > New > Other > Spring Boot > Spring Starter Project. Choose it and click ‘Next’. Then you will see a prompt that looks something like this.
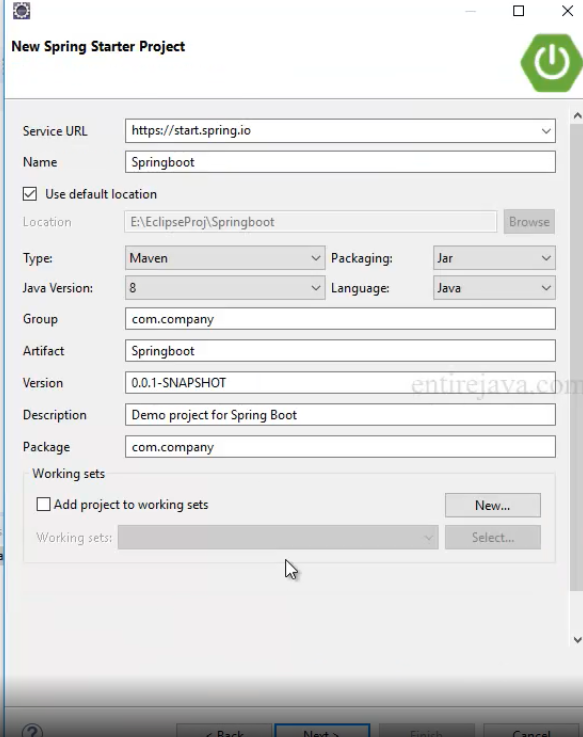
In this prompt, you will provide all the details to let ‘Spring Initializr’ (Discussed in next section) know, the kind of project it needs to create.
Server URL : URL of Sprig Initializr, we will talk about it in next section
Name : You will let Sprig Initializr know what name you want it give to your project
Type : Project management tool you are using. Maven or Gradle. In our case we are using Maven. ‘Sprig Initializr’ will create the project accordingly.
Packaging type : Defines what is the resuliting artifact that you want to create. It must be ‘war’ if you want to deploy your application on Tomcat server or it must be ‘jar’ if you want to create a self contained ‘Fat Jar’.
“Wait what!!? A FAT Jar?” 😱
I am sure you are wondering what is ‘Fat Jar’. We will talk about it in coming sections.
Group/Artifact/Version : Maven stuff!
Description/Package : You must be knowing what it is!
Click ‘Next’, and then you see something really cool!

Typically in maven projects, if you want to use a technology (Ex: AWS, PostgreSQL) you need to search on the internet all the list of dependencies required and then add them in to your project POM.xml.
But, Spring Boot gives you convenience. Here you simply chose the technologies that you need in your project. For example, if you use ‘PostgreSQL’ as your Database, just search for it and add it in the list, and spring will take care of downloading all the libraries that you ever need to use PostgreSQL. In our case though, we are going to keep it simple and create
The underlying concept is called ‘Spring starter dependencies’, which will be discussed on coming sections.
Note : You can hover your mouse over each of the items above and see what they offer.
Creating Spring boot project using spring initializr
I was yelling about ‘Spring Initializr’ for quite some time. Let’s get some clarity on that..
Visit : start.spring.io (Remember? This was the same URL we’ve seen while creating the project using the plugin). You will see a screen like this.

If you relax and observe carefully, you notice that the fields in here are the exact same fields that we’ve seen while creating the project using Spring Tool Suite plugin.
Once you enter the values here, you can click on ‘Generate the project’ button, which will download a project in .zip file.
You can import that project in to your eclipse and it is as good as creating a project using the plugin! In other words, spring tool suite plugin is doing the same job, what you’d other wise need to do without it.
Creating Spring boot project using spring boot CLI
This is by far the weirdest way to create a spring boot project. IGNORE!! Just ignore this by all means!
You need to know Groovy in order to leverage this functionality. More over, almost you will never get to create projects this way. Even more, this is going to take up a lot of real estate in this tutorial.
Spring Boot Starter Dependencies
The resulting project structure may look something like this..

We will explore about auto-generated SpringbootApplication.java file in a bit, but lets explore what’s happening in pom.xml file (This is where the magic happens!). In this section we will talk about ‘Spring starter dependencies’
If you open the pom.xml file, you’d notice one dependency..

All the dependencies that has the word ‘starter’ are spring dependencies. But before that, remember what I said about Maven transitive dependencies? It means, if you added one maven dependency, maven will not only download that dependency, but also the dependencies that, that dependency depends on!
Look what spring initializr has added (Look above pic!) ‘Spring-boot-starter-web’. This dependency will help maven find all the dependencies that you’d ever need to start creating web applications. Because ‘Spring-boot-starter-web’ depends on all those required libraries.
This is the dependency which we’ve chosen while creating the project. If we had chosen some other starter dependency like this (Say AWS, MongoDB, etc) spring will add their corresponding start dependencies too and ask maven to download all the libraries.
Makes sense?
Spring Boot Version Management
To complement the starter dependencies, you also don’t have to specify the version of the starter dependency (I mean, there is no ‘version’ tag, like you’d normally do with maven dependencies). The magic happens with the ‘parent’ project inheritance (Feature of maven. Again, if you are disparate to learn maven, I recommend this maven course)
I mean, look at this tag in pom.xml
 <parent>
               <groupId>org.springframework.boot</groupId>
               <artifactId>spring-boot-starter-parent</artifactId>
               <version>2.1.7.RELEASE</version>
                <relativePath /> <!-- lookup parent from repository -->
</parent>
All spring boot projects are children of a parent called “Spring-boot-starter-parent”. If you look at the pom.xml file of this parent project, it will have all the started dependencies that spring boot ever offers, “ALONG WITH THEIR VERSIONS!”.
One of the features of maven is, if you specify one dependency (Say ‘A’) and the same dependency is also present in parent project, then maven will inherit all the properties of it. In our case, all the starter dependencies will inherit versions from the parent project. So that you don’t have to worry about it.
Without spring boot, there is a chance that you come across with incompatible libraries or version mismatch issues. Spring boot solves that problem like a super man (or women!)
But! You do have to specify that parent project version though (Like above).
Makes sense my friend? We are good to go to next section?
Spring boot maven plugin
Another tag of significance is this
 <plugins>
               <plugin>
                            <groupId>org.springframework.boot</groupId>
                            <artifactId>spring-boot-maven-plugin</artifactId>
               </plugin>
</plugins>
This again is a feature of maven! (Please take this damn course on Maven 🙏. Maven is common is all projects!)
But, in simple words, this plugin provides Spring Boot support in Maven, letting you package executable jar or war archives and run an application “in-place” (We will see how, in coming sections)
Writing a ‘Hello world’ Spring boot application
It’s time to buckle up and write a very miniature application logic with some basic functionality.
Note : At the end of this chapter, I will put a link to download this project.
The functionality is as follows
- First we create a Form where the user will enter some text and click ‘Submit’ Button
- We will have a controller to handle that request and return the same entered value along with a view
- We will display the message on another view
Ultimately, the user will enter some text and click on ‘submit’ and then the same text will be displayed back 😛
For our purpose we are going to be using apache Freemarker for view. You could use JSP, Thymeleaf, etc as well. The first thing we need to do, is to add starter dependency of Freemarker in pom.xml.
<dependency>
    <groupId>org.springframework.boot</groupId>
    <artifactId>spring-boot-starter-freemarker</artifactId>
</dependency>
Next is to introduce a form that the user will see when they visit our application on the browser.
This will go inside “Springboot\src\main\resources\templates”
<!DOCTYPE html>
<html>
  <body>
    <form action="/Springboot/hello" method="get">

      <input type="text" name="name" /> <input type="submit" />

    </form>
  </body>
</html>
Next we are going to introduce the controller logic that will handle the request.
This will go inside “Springboot\src\main\java\com\company\Controllers”
@Controller
public class HelloWorldController {

@RequestMapping("/hello")
public ModelAndView showMessage(
@RequestParam(value = "name", required = false, defaultValue = "World") String name) {

   ModelAndView mv = new ModelAndView("hello");
   mv.addObject("name", name);
   return mv;

}
}
Talking about this is more of a Spring MVC concept and will need tutorial of it own. Hence, I won’t go too much in tot it. But, at a high level, when the request URL has the string ‘hello’, that request would end up in this method.
Here we are trying to read the form data entered by the user and returning ModelAndView object. Model will have the user entered data and the view will take that data to display. The view that we are trying to use is with the name “hello”.
If you want to learn spring MVC, here is a nice course on the same Spring MVC with Sprig Boot
Finally, let’s also introduce the ‘hello’ view. This will go under “Springboot\src\main\resources\templates\hello.ftl”
<!DOCTYPE html>
<html>
<body>
<h3> ${name}</h3>
</body>
</html>
The above code just displays the model data. The code looks cute though 😚
Running our application!!! Yes, that’s true!
We are good to go and run our application and of course, see it working! You don’t have to do anything, that’s why spring boot came in to existence.
What’s even more cool is, you don’t even have to build the application and then deploy the artifact on tot he tomcat server. Everything will be taken care by Spring Boot!
Note : We will talk about the internals and how it works, but let’s launch our application and get a sense of satisfaction.
All you need to do is to run the file SprinbootApplication.java (It has main() method in it!), just as you’d run any other java program. Once you do, you will the following result on the console

You see the Tomcat server started at port 8080. Spring had initialized web application context & root application context (Basically, just check the output above and see if sounds familiar)
Visit : localhost:8080, you will see a user form

Enter something and click ‘Submit Query’ and you will see the same message getting displayed.
@SpringBootApplication annotation that does the magic!
If you open the file SpringbootApplication.java that was auto-generated, you’d notice an annotation “@SpringBootApplication”. This annotation is actually combination of multiple other annotation,

@springBootConfiguration – Is equivalent to @configuration annotation in spring MVC. Where you’d define all your beans.
@EnableAutoConfiguratoin – This annotation does some stuff that sounds futuristic. “IT WILL AUTO CONFIGURE COMPONENTS BASED ON THE STARTER DEPENDENCIES”
Look! Have we configured Dispatcher Servlet? Have we configured a View resolver? No! Because, Spring boot is aware of the starter dependencies and based on that it made a guess on what are the components required and created them for us!
Even if you were to add another starter dependency, may be an ORM framework like Hibernate, you don’t have to configure the DataSource, etc. In some instances, you don’t even have to configure Database parameters!
Note : If you wish you can override the auto-configurations. But, we won’t discuss now.
@ComponentScan – This annotation will enable Spring boot to automatically discover and configure all the beans that are annotated with spring component annotations like @Controller, @Service, @Component, @Repository, Etc.. (These are all Spring MVC concepts)
Ignore other annotations, they are not so important at the moment.
You also notice an instruction in the class that says SpringApplication.run(..). It is this statement, that will kick start everything.
Creating a Fat A** jar (Finally!)
A** -> APP
Usually in production environment, you don’t tend to run a java program. You’d build a jar/war archive and run it.
Right click on the project > Run As > Maven build > Type the goal as ‘Package’ and run.
Under ‘target’ directory, you will see a jar file.
Run the command : java -jar <Path to jar file location>/filename.jar
It would launch our application and you can access it from your browser. Internally, it would call the ‘main()’ method.
Unlike typical .jar files, this jar files has many things in it. It has Embedded servers, Libraries, Database (If we had one!), etc. Literally everything to run your application. Hence, making it a ‘Fat Jar’ or a ‘Runnable Jar’ or ‘Standalone application’.
Understanding what is Spring Boot now..
Look! These are the steps we had to take care of, without spring boot..
- Create a Maven/Gradle Project in eclipse
- Find the required dependencies and add those tags in POM.xml
- Download the Tomcat Server, install it and configure in IDE (To run/test the application)
- Download and install Database Software and run it (If your application is Database driven)
- Code your application
- Create a config file(s). In case of spring, you’d need to define all the beans (Dispatcher servlet, View Resolver, etc)
- If there is a DB, you need to configure database parameters, Datasource, Entity Manager (Or for any other service)
- Build the project, Deploy the artifact on to the server and run it
And, these are the steps we had to take care of, with spring boot..
- Create a Maven/Gradle Project in eclipse
- Code your application
Be happy that Spring boot allowed us to take care of steps ‘1’ & ‘5’. Otherwise, we would not have jobs today.
Now, let’s me put the definition of Spring Boot, and you’d understand what it means, by yourself..
“Spring Boot makes it easy to create production-grade stand-alone Spring based Applications that you can ‘just run'”.
This Spring boot tutorial has now helped you familiarize with these concepts..
- What is spring boot?
- What does spring boot do?
- Spring boot starter dependencies
- Auto-configuration
- Spring boot initializer
- Spring tool suite plugin
- Hello world with spring boot
- Embedded servers
- Fat Jar, Self contained jar, Runnable jar
Congrats! Wish you good luck, and hope to see you soon!